
Many of the original controls in Repeat Signage support playlists and scrolling. The examples below show the picture control being used in 4 different ways to give your presentations flexibility. These are examples using the picture control, but the same principles apply to other controls.
Single control
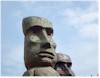
The above picture shows a picture control displaying the 'Heads.jpg' sample picture.
To insert a picture control:
1. Create a new presentation or open an existing one.
2. On the designer screen menu, click on 'Insert' then 'Insert picture'. This will allow you to choose a picture file.
3. This defaults to 'On local or network drive'. Click on the browse button and choose a picture file, for example 'Heads.jpg' and then click on 'Open' to return to the previous screen.
4. Now click on OK to insert the new picture control onto the designer.
You can then position and size your Picture control as required. Double click the Picture control to view the properties.
Control using a playlist
The above pictures show a picture control with 4 pictures being display and changing every 1 second. To create a picture playlist:
1. On the designer screen menu, click on 'Insert' then 'Insert picture'. This will allow you to choose a picture file. This defaults to 'On local or network drive'.
2. Click on the browse button and choose a picture file, for example 'Heads.jpg' and then click on 'Open' to return to the previous screen.
3. Now click on OK to insert the new picture control onto the designer. You can then position and size your Picture control as required.
4. Double click the Picture control to view the picture control's properties.
5. Put a tick in the 'Use play list instead' tick box. This will take you to the Playlist tab. Your first Picture appears in the grid for you.
6. Use the 'Add' button to add other Pictures to the list. Repeat Signage sample pictures FootPrint.jpg, Heads.jpg, Penguin.jpg and PirateFlag.jpg are using in the above example.
NOTE - You could also use 'Add blank' to add blank items which can be used to give a pause between playing your gif files. For example, you could insert a single gif file and set it to display for 2 seconds. Then insert a blank item again for 2 seconds. This would then give the effect of flashing the picture on and off the screen.
NOTE - With the Picture, PDF and Text label control there is also the option of using a transition, such as fade, between items in the play list.
7. When you have added your play list pictures, then click on the OK to close the properties screen and return to the designer. Your play list will start playing immediately. The length of time each one will display form will depend on how long you specified for each play list item.
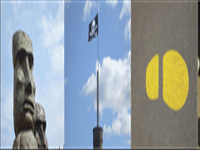
Simple scrolling picture control
(IMPORTANT NOTE - The scrolling examples above use animated gifs to give you an idea of different scroll types. Scrolling in the actual software is smooth and not jerky)
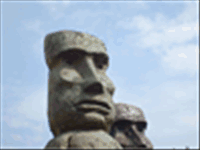
The above picture shows the 'Heads.jpg' and 'PirateFlag.jpg' sample pictures scrolling from right to left. You can also scroll 'left to right', 'top to bottom' and 'bottom to top', plus diagonally. To create this:
1. Create a play list of controls - Follow the instructions for creating a play list above so that you already have a picture control with a playlist. Use the four sample pictures: FootPrint.jpg, Heads.jpg, Penguin.jpg and PirateFlag.jpg.
2. Open the picture control's properties by double clicking it and then selecting the 'Scrolling tab'.
3. Change the 'Scroll direction' combo box to an entry other than NONE, for example RIGHT TO LEFT. Click on OK to see it scrolling.
For more scrolling options, on the properties 'Scrolling tab', press the F1 key to see the various options.
Simple scrolling with pause picture control
(IMPORTANT NOTE - The scrolling examples above use animated gifs to give you an idea of different scroll types. Scrolling in the actual software is smooth and not jerky. There is a pause between the scrolling of images in the above sample.)
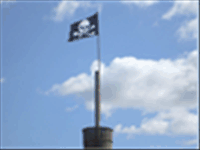
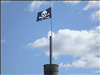
The above picture shows the 'Heads.jpg' and 'PirateFlag.jpg' sample pictures scrolling from right to left. You can also scroll 'left to right', 'top to bottom' and 'bottom to top', plus diagonally. To create this:
1. Create a play list of controls - Follow the instructions for creating a play list above so that you already have a picture control with a playlist. Use the four sample pictures: FootPrint.jpg, Heads.jpg, Penguin.jpg and PirateFlag.jpg.
2. Open the picture control's properties by double clicking it and then selecting the 'Scrolling tab'.
3. Change the 'Scroll direction' combo box to an entry other than NONE, for example BOTTOM TO TOP.
4. Change the 'Pause between items seconds to 2.
5. You will usually want the next time to scroll on quiet quickly between paused items, so change the 'Pixels to move each move time' to 15
6. Click on OK to see it scrolling.
This will scroll very quickly between pictures, but pause for 2 seconds when the picture is completely filling the control. For more scrolling options, on the properties 'Scrolling tab', press the F1 key to see the various options.
Advanced scrolling picture control
(IMPORTANT NOTE - The scrolling examples above use animated gifs to give you an idea of different scroll types. Scrolling in the actual software is smooth and not jerky)
The above picture shows the sample pictures FootPrint.jpg, Heads.jpg, Penguin.jpg and PirateFlag.jpg sample pictures scrolling from right to left, but with the picture control and scrolling items sizes so that several of the pictures are scrolling together. You can also scroll 'left to right', 'top to bottom' and 'bottom to top', plus diagonally. To create this:
1. Follow the instructions for simple scrolling above.
2. Open the picture control's properties by double clicking it and then make sure you are on the 'Playlist' tab. Make sure you have the 4 sample pictures in the play list grid.
3. Click on the 'Scrolling' tab. Take the tick out of the 'Playlist items same size as control' tick box. This will then display the 'Specify play list item size'. Set the Width to 100 and the height to 75.
4. Click on OK to save and return to the designer screen.
5. Now resize the picture control to 300 x 75 pixels. You can do this by clicking once on the picture control to select it and then changing the size on the menu 'Size in pixels' section.