
Note - All the information below on changing play list tasks will work when adding and editing play lists. If you are using the 'View current play list' option when a play list is playing, by right mouse clicking the playing presentation and selecting this, then you will not be able to add, edit, resize or delete tasks. The 'View current play list' screen also self closes after 2 minutes.
Play list types
There are several play list types you can choose from depending on the way you want to display presentations including CONTINUOUS, HOURLY, DAILY, WEEKLY and DATES. Please see Play list types for more details. The STANDARD play list type has a different screen design and is covered in a separate help page.
Play list screen
The scheduling grids that are displayed on this screen are dependent on the play list type (see above) which has been selected. For example, HOURLY just shows a grid that represents an hour in 5 minute blocks, where as WEEKLY shows a grid of each hour in the week.
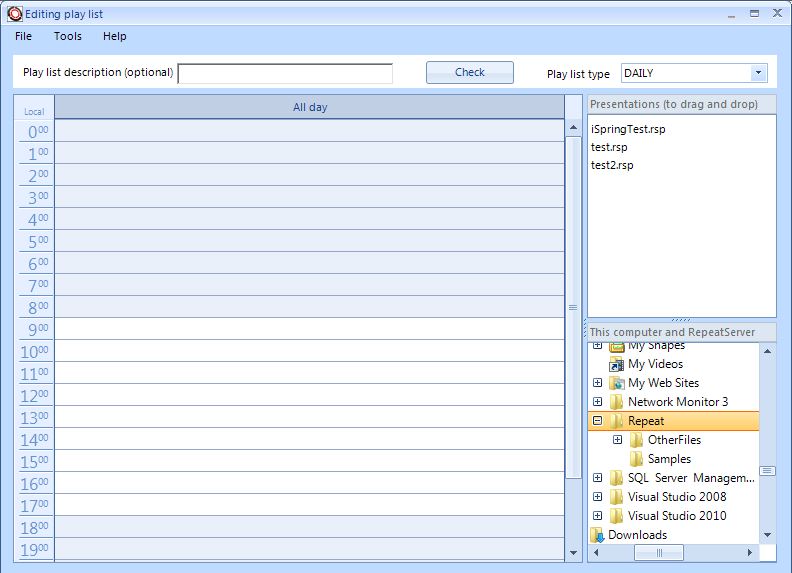
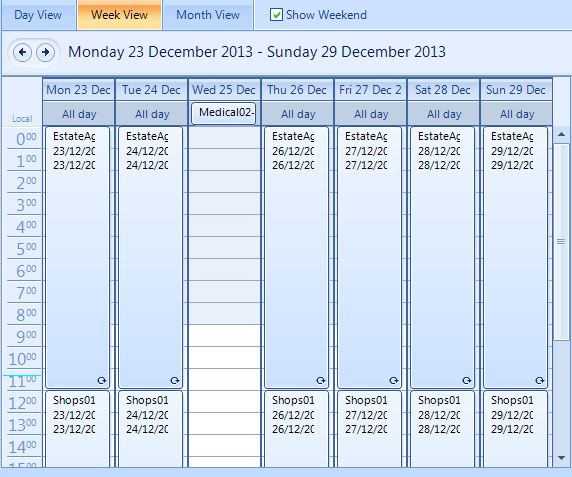
The picture above shows the layout in DAILY mode. First thing to notice is the top right corner where it says 'Play list type' which is currently set to 'DAILY'. This drop down list allows you to change the Play list types to either CONTINUOUS, HOURLY, DAILY, WEEKLY or DATES. If you change this to any of the other types, then the grid in the middle left changes. Currently, because this is in DAILY mode, then the left side is showing times starting at 0.00 to 19.00 (Midnight to 7pm). If you scroll down using the scroll bar to the right of the grid then you will see the end at 23.00 (11pm). The grid is therefore split into 24 1-hour grid blocks.
At the right side of the screen, middle top, is a section entitled 'Presentations (to drag and drop)' and underneath is a list of Repeat Signage presentation times. This may be blank if you haven't created any yet. This shows all the Repeat Signage presentations files in the currently selected folder, which leads us to the area below that called 'This computer and RepeatServer'. This shows the folders on your current computer and defaults to the default Repeat Signage data folder for the current Windows user. You can use the up/down and left/right scroll bars in this section to find and select other folders.
Maximizing the play list screen
TIP - In order to see as much of the grid as possible, without scrolling, then use the maximize button at the top right of the screen just to the left of the X.
Scheduling presentations
On the right side of the play list screen is the 'Presentations (to drag and drop)' area and the 'This computer and Repeat Server area:
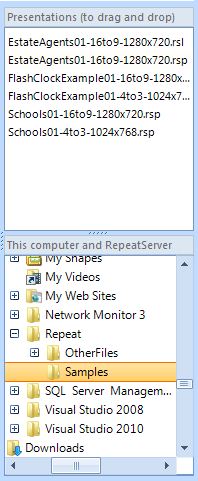
The 'This computer and RepeatServer' area defaults to the where you presentations are stored. The 'Presentations (to drag and drop)' area shows a list of presentations in the currently selected folder. The easiest way of scheduling one of these presentations is to click on the presentation and then drag and drop it onto the schedule area. Drags involves clicking on the presentation, keeping the left mouse button held down, dragging the presentation over the schedule to the point in time you want it to go, and then releasing the left mouse key.
You can also schedule presentations by double clicking on empty schedule grid spaces to bring up a new schedule task. You can then browse for either local presentations or presentations hosted on websites.
NOTE - With the STANDARD type of presentation, you use the 'Add' button to simply add presentations to the play list instead.
Shutting down the computer tasks
In some situations, you may want to automatically shut down the player computer at a specific time. This is ideal when used in shop windows are you want to turn off displays at say 10pm. To schedule a shut down, then double click on an empty schedule grid space and the new schedule task form is shown. Use the 'Shutdown computer' button to specify a shut down rather than a presentation.
Scheduling the turning off of the screen
To schedule the turning off of the screen, then double click on an empty schedule grid space and the new schedule task form is shown. Use the 'Turn monitor off' button to specify a screen off rather than a presentation. Repeat Signage automatically displays a blank black presentation underneath the screen off, so that the system is doing a minimum amount of work. If a user presses a key on the keyboard, or moves the mouse, then the screen will power back on. A timer is in place for this and the monitor will automatically turn off again after 1 minute.
Moving and resizing scheduled tasks, and altering the rule scale
You can drag and drop tasks from one part of the schedule grid to another. However, Repeat Signage doesn't allow you to overlap tasks so if you drag and drop a task over another one, it will cancel the drop.
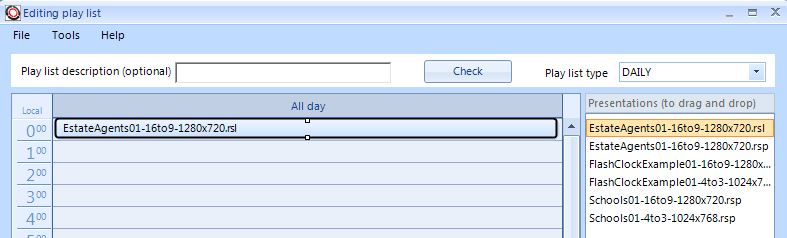
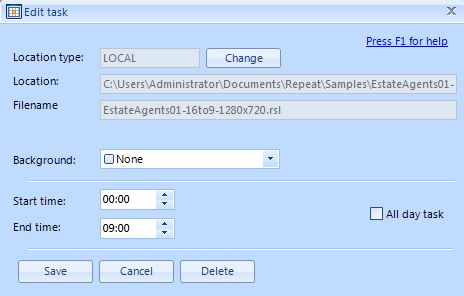
See the above picture. To resize tasks, then click on this task in the grid (The EstateAgents01-16to9-1280x720.rsl) and if you look in the above picture of the highlighted task next to 0.00 then you will see it has two small white blocks in the middle. These are resizer handles and if you click on the bottom one, hold down your left mouse key and drag down, it will change the size of the task. Again, you cannot overlap another task, so the resize will not allow you to overlap an existing task.
You are limited with the resizing to whole blocks on the grid. For DAILY, WEEKLY and DATES schedule types, then this is defaults to whole hours. So if you need to set a task to a half hour, then you either need to edit the task by double clicking it (and altering the start and end times), or alter the scale on the ruler .
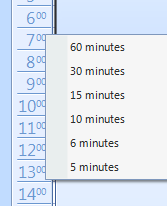
You can alter the ruler on the left hand side of the screen to a different scale (60 mins, 30 mins, 15 mins, 10 mins, 6 mins or 5 mins). That way, when you resize a task, it will resize to multiples of the new rule block size.
'All day' area
In the picture below you will see a line of grey boxes about an inch from the top with the words 'All day' in. This is the 'All day' area. If you drag and drop a presentation to this area it will schedule a task that covers that entire day (as long as you don't have any other tasks that day, as overlapping is not allowed). You will notice on the picture below that on 'Wed 25 Dec' that there is a task in this area called 'Medical02. This task will play for the entire day.
Note - You will only see an 'All day are' for DAILY, WEEKLY and DATES schedule types.
Editing tasks
Double click existing tasks to edit them or right mouse click them and select 'Edit task'. You can change the times of the task. Using this option allows you to change the times of tasks.
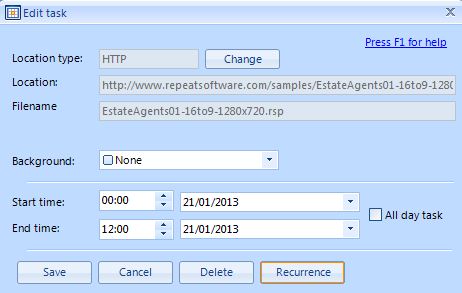
See the above picture. What is displayed on the editing task screen is dependent on the play list type. For example, the above task is from a DAILY play list and has a tick box all 'All day task'. This allows you to add a task to the grid then double click it and put a tick in this box. The task will then make that presentation play for the entire day. This is more useful when using the WEEKLY or DATES play list.
You can change the colour of a task by editing it and then changing the background drop down to another colour.
The selected presentation can be changed by clicking on the 'Change' button. If you playing presentations hosted on your website, you will need to use this button to then select a presentation from your website.
You cannot overlap tasks, so if you already have a couple of tasks on a particular day and change one to 'All day task' then it will not allow this.
Deleting scheduled tasks
Highlight a task in the grid and then use the delete key on the keyboard. You can also double click the task to open it and then use the 'Delete' button. You can also right mouse click tasks and use the 'Remove task' button.
Copying scheduled tasks
Moving a task can be done by dragging and dropping a task from one cell on the schedule grid to another. If you hold down the control key (Ctrl) on your keyboard before doing the drag and drop then this will copy the task instead. You cannot drop onto an existing task or overlap an existing task.
Recurring tasks with the DATES play list type
With the DATES play list type, you can use recurring tasks. What you do is drag and drop a presentation onto the grid as normal, then double click it to show the task:
The 'Recurrence' button can then be clicked to open the 'Edit recurrence' screen:
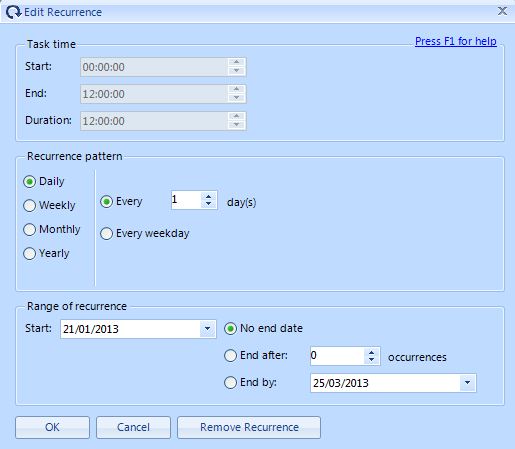
In this case above, we selected the recurrence pattern of 'Daily' and every 1 day. This means that this presentation will play every morning continually. The recurrence rules are quite flexible and you will notice that in the above picture that you can also specify an 'End by' date. This gives the flexibility to just have a pattern for a month, and then do different scheduling in the next month, etc. The recurrence patterns of Daily, Weekly, Monthly and Yearly are also available.
The above pictures shows recurring tasks each morning until 12pm of the Estate Agents sample presentation and then the Shops sample for the rest of the day. You can also delete occurrences of this task by highlighting an occurrence and pressing the delete key, selecting 'Delete this occurrence' and clicking OK. This then means you an put a different task on specify days, such as holidays like Christmas Day, Halloween, etc. In the above picture, the Estate Agents and Shops task have been deleted on the 25 December and another presentation has been scheduled instead.
Recurring tasks have the
 symbol
in the bottom right corner. When you double click them to edit, you
will see:
symbol
in the bottom right corner. When you double click them to edit, you
will see: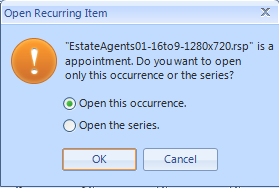
which gives you the option of opening this occurrence of the task, or selecting 'Open the series' where you can alter the times and presentation which affects all of the instances of this task. Pressing the delete key on an occurrence allows the deletion of the entire series or just that specify instance.
Using presentations hosted at RepeatServer.com
You can host presentations free of charge at RepeatServer.com which is a central worldwide point you can get remote computers to play and collect Repeat Signage presentations from. Click here to read about this free service. At the top of the bottom right list is a 'RepeatServer.com' entry. If you click on this it will display presentations you have uploaded to RepeatServer.com.
To use RepeatServer.com for the first time:
- Go to RepeatServer.com and create a free account.
- Login to RepeatServer and use the upload files option to upload presentation files. There is help available on the website pages if necessary.
- Back to Repeat Signage and the play list you are adding or editing. Right mouse click RepeatServer.com entry in the list and select 'Edit account details'. Enter your RepeatServer.com email address and password and then use the 'Test account settings' button to make sure you can connect to RepeatServer.com. The email address and password must be value and you need an Internet connection. Click on 'OK' afterwards to return to the play list screen.
- You will see 'Getting listing' in the top right presentations grid and as long as you have uploaded presentations you will see them in the list. You can now click on them and drag and drop them onto your schedule.
Using presentations hosted on your website or FTP site
You can play presentations you have uploaded to your own website. The way you do this:
- Double click on an empty schedule grid space so that it brings up a new schedule task
- This will automatically display the 'Select presentation file' box (it takes a few seconds to load for the first task you add)
- On the 'Select presentation files' screen, select the 'On a website' option and then type in the URL address of your presentation. One of our samples is below for an example:
https://www.repeatsoftware.com/samples/Shops01-4to3-1024x768.rsp
- Click on 'OK'
- Finish by settings the start and end times. Alternatively, just save this and then you can drag and drop the task in the grid to move it or resize the task by stretching the task.
For playing from an FTP site, the do the above but select 'on an FTP site' instead.
We have a number of sample presentation Sample presentations on websites which you can use when testing play lists.