
Spreadsheet control
Input spreadsheets to your digital signage, data and graphics
| Supported file types | You can manually create spreadsheets within Repeat Signage
with our 'Built-in spreadsheet' option, and display .xlsx and .xls
(Microsoft Excel) Spreadsheets with passwords are not currently supported. We only offer basic graphing support. |
| Playlist support | Yes |
| Scheduler support | Hourly, daily and weekly scheduling |
| Scrolling support | Yes |
| File locations | Available in Standalone edition and above, plus
Repeat Pictures. Files on local or network drives (all
editions), Internet websites,
www.repeatserver.com and FTP sites (Standard and above editions) |
| Training Videos |
Repeat Signage Control - Spreadsheet control create, edit and play
spreadsheets (3.37 min/secs) (all editions of Repeat Signage
software) |
Description
This control allows you to display existing Microsoft Excel .xlsx file and allows you to use the built in editor to create spreadsheets within your presentations. You can also create and display graphs from your information. This gives you an easy way to display formatted information in grids and you also have the ability to insert pictures as well. This is ideal for easily creating menus for restaurants, displaying sales figures in a sales office, or listing today's events in hotel lobbies, venues and even court rooms.
Our simple graphing system allows you to display graphs to your audience. For example, in a school your could display attendance figures for classes:
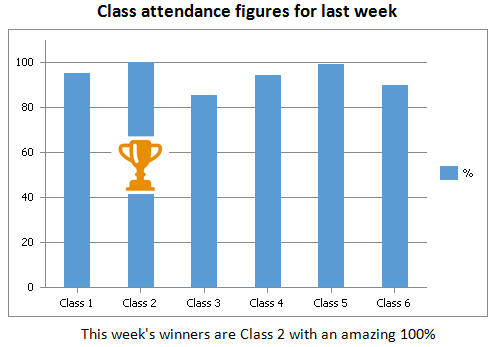
With existing spreadsheets, you can also select which tab to display and the top left starting cell. Another nice feature is the ability to display or not display the spreadsheet grid lines.
You can also create a looping play list for sheets from your spreadsheet file. For example, in a restaurant, you may want to display 3 pages of menu information, such as 'Beverages', 'Main courses' and 'Cakes' and have each page on screen for 5 seconds and revolve in a loop. You can do this by creating a spreadsheet with 3 tabs and put a menu on each. You can then use the 'Sheet play list' tab to add the sheets to the play list:
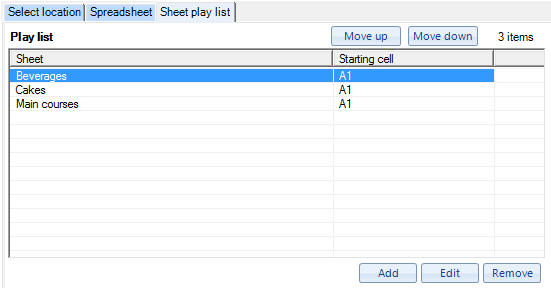
You can also schedule on a hourly, daily, or weekly basis from within a Spreadsheet control. So you could use the daily option to display your lunch time sheets say between 11am to 2pm, and then display different sheets at breakfast and dinner times. Pictures and graphs can also be inserted into your spreadsheets which allows you to flexibly create and layout menus and other tabular information with ease.

The spreadsheet control is ideal for displaying lists of information, which can be updated from your network quickly and easily, or even remotely at RepeatServer.com. (We also have a Datagrid control if live database information needs to be displayed).

The built in spreadsheet option stores all the spreadsheet information internally within the Repeat Signage Presentation (.rsp) file. The advantage of using a separate spreadsheet file is that this can put on a computer network drive and Repeat Signage presentations can play this spreadsheet and "monitor" for changes, say every 5 minutes. If you then edit the spreadsheet from another computer on your network, the playing Repeat Signage presentation will detect this and automatically load and play the new file.
Repeat Signage has a spreadsheet on the 'Free tools' menu on the main Repeat Signage screen. You can use this to create your own Excel .xlsx spreadsheet files. You can install the trial version of Repeat Signage on as many PC's as you like and the trial never expires. This allows you to edit spreadsheet files you use with Repeat Signage on your network free of charge and you don't need Microsoft Excel installing.
Remote updating is also available with our Standard and above editions. The easiest way is to use our free www.repeatserver.com service to host your spreadsheets, and you can even edit them online from any computer with a browser, or edit them on your computer and upload new copies when needed.
Spreadsheets in other controls
Our PDF/Document control, Banner control and Picture control also display spreadsheet files. However, these do this by pages the same way as if you printed the spreadsheet out.
Pictures in spreadsheets
You may want to decorate your spreadsheets with Repeat Icons and pictures, so the spreadsheet tool bar has these insert buttons:

which support our Repeat Icons:
which can be used to decorate spreadsheets:
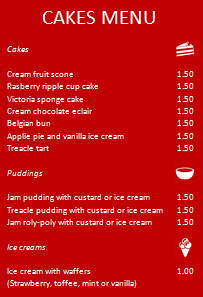
and our picture system:
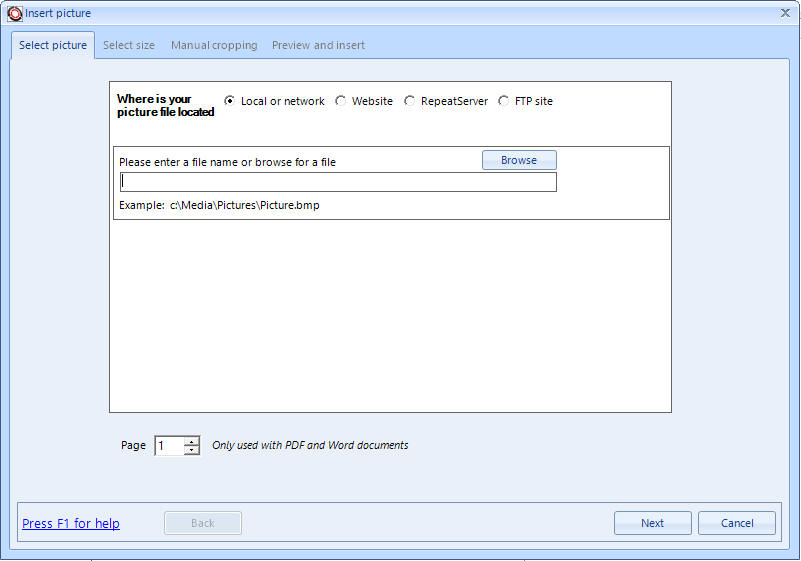
so you can collect pictures from a variety of sources. It allows you to crop and resize images to insert into your spreadsheets.
Pictures can also be rotated by clicking on them and using the resizer handles an the green circle rotate handle:
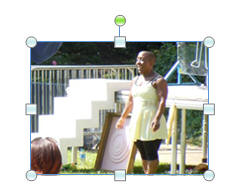

Pictures added you to spreadsheets through Repeat Signage save details on your icon or picture and double click pictures allows you to edit them with ease.
IMPORTANT NOTE - Spreadsheet compatibility
Our spreadsheet control is not 100% compatible with Excel. There are differences with the way graphs are rendered and other advanced features. Spreadsheets with passwords are not currently supported.
Alternatives to this control
You can export from Microsoft Excel or OpenOffice.org Calc as PDF file files. These can be displayed with our PDF/document control, Picture control or Banner control instead.
A spreadsheet shows a grid of information and to update this grid, you will need to update the spreadsheet. If you want to display grids of live information, such as from a database (or your MIS via ODBC) then consider using our Datagrid control (Standard and above editions).
Simple spreadsheets
On the designer screen menu, click on 'Insert' then 'Insert spreadsheet'. This will allow you to either browse and select an existing spreadsheet or use the 'Built-in spreadsheet' option to create one. Once you have created your spreadsheet and it appears in your presentation, you can resize it to display just the information you require. Double click the Spreadsheet control to edit and make changes.
Sizing your spreadsheet control and zoom
When you have your spreadsheet control on screen, then the bigger you make this, then the more columns, rows and cells you can see from your spreadsheet. There is also a 'Zoom percent' option which defaults to 100%. Changing to 75%, etc, will make everything in your sheet look smaller so that you can get more information on screen, and changing to 150%, etc, will zoom in and you will display less rows and columns but everything will look bigger.
Play lists of sheets within a spreadsheet
When editing your presentation, then double click the spreadsheet control and use the 'Sheet play list':
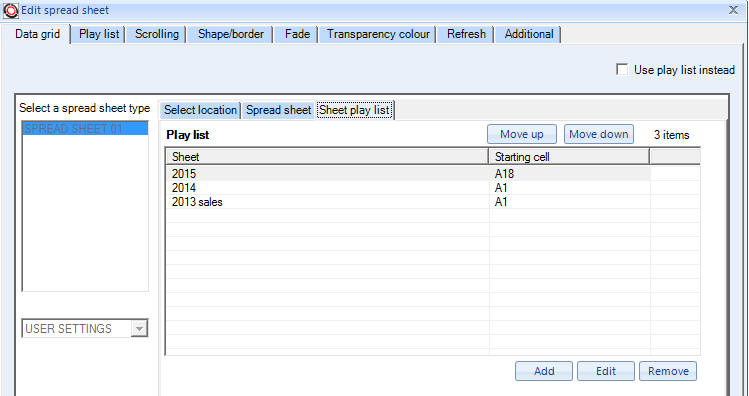
and use the 'Add' button to add which sheets to display and optionally the starting cell for each sheet.
Play lists of different spreadsheets
You can create a play list of spreadsheets. Insert a spreadsheet as for 'Simple spreadsheets' above. Then double click the Spreadsheet control to display it's properties. Put a tick in the 'Use play list instead' tick box. This will take you to the Playlist tab. Your first spreadsheet appears in the grid for you. Use the 'Add' button to add other spreadsheets to the list. Use 'Add blank' to add blank items which can be used to give a pause between playing your spreadsheets. For example, you could insert a single spreadsheet file and set it to display for 2 seconds. Then insert a blank item again for 2 seconds. This would then give the effect of flashing information on and off the screen.
Scheduling the playing of spreadsheets (Standard and above editions only)
The information on creating a play list above shows you how to create a 'Play list of different spreadsheets' that just loops files. On the play list tab, there is a 'Schedule type' drop down list. You can change this from 'PLAYLIST' to 'HOURLY', 'DAILY', or 'WEEKLY'. The difference between this and the 'PLAYLIST' option is that when you add items you have to specify 'From' and 'To' time values.
For example, an HOURLY scheduler can be used to play a file at the start of every hour for 1 minute (0 minutes 0 seconds to 0 minutes 59 seconds). You have to put in files to cover the entire hour. If you don't want anything playing for the rest of the hour, then insert a blank item that covers from 1 minute 0 seconds to 59 minutes 59 seconds. At the end of an hour, the entire hourly schedule will loop again. When you play a presentation, it displays items based on the current time or day.
When you add a blank item, you can decide whether to make the blank item display the background of the control (which you can specify a colour or picture for) or whether to make the entire control invisible. When adding or editing a blank item, go to the 'Blank item' tab and either tick or un-tick the 'Entire control is visible' box. This is useful for scheduling when you want a control invisible.
The DAILY schedule type allows you to specify files and blank items to cover the entire day. At the end of the day, the schedule will start again. WEEKLY allows you to schedule what happens on each day of the week (at any time), and then restarts at the beginning of the next week. Repeat Signage uses Monday as the first day of the business week. Another thing to note is that every control that supports scheduling runs independently of all others, so you can have lots of different controls all doing different things.
Tools have been added to Repeat Signage to help you test scheduling. On the designer screen menu, you can click on 'View' then 'View program time for schedule testing'. Clicking on this puts the time on the bottom right of the designer screen menu. This is the clock that Repeat Signage uses with controls. You can change this time using 'View' then 'Change program time for schedule testing'. This allows you to change either the time or date, so that you can see what will be displayed at any point. For example, you may have an 'offer of the day' for each day of the week, made by displaying pictures in a picture control. Changing the program date to another day will allow you to test that the correct picture file, with that day's offer on, is being displayed.
Playing spreadsheets from RepeatServer.com
You can create a free RepeatServer.com account and use to create and edit spreadsheets to use in your Repeat Signage presentations, which can be updated from anywhere in the world. When you insert a spreadsheet control in your presentation you can choose to collect it's text from a website or point it at a spreadsheet on RepeatServer.com. You then get your presentation to monitor the online version for changes. When it detects that you have changed the spreadsheet in your online account, a new version of the spreadsheet is automatically downloaded and played whilst your presentation is running.
See some of our training videos on creating a RepeatServer.com account:
RepeatServer.com - Create a free account from within Repeat Signage
Changing spreadsheets on screen whilst a presentation is playing
When you insert an existing spreadsheet into a presentation, rather than creating it with the built-in spreadsheet option, Repeat Signage can check the file's date/time periodically to see if that file has been changed since your presentation loaded.
For example, you may display a coffee menu on screen with current prices on. If this spreadsheet is in a text file on a network drive, such as n:\menu.xlsx then you can change this menu whenever you like from another computer on the network using Microsoft Excel or the Repeat Signage spreadsheet program on the Repeat Signage 'Free tools' menu.
To set your spreadsheet control, within your presentation, you need to open the spreadsheet control properties by double clicking it. Use the 'Refresh' tab and put a tick in the 'Check for updated content' tick box. If you tick the 'For local/network files - monitor file system for file changes and update ASAP' then Repeat Signage will monitor this file for when it changes.
Creating spreadsheet documents
Repeat Signage has a built-in spreadsheet creator which can be accessed from the main screen's 'Free tools' menu. Since this uses the same system used to display your spreadsheet, you can guarantee that what you see if what you get. Just make sure you save your spreadsheets in .xlsx format.
Duplicating pictures
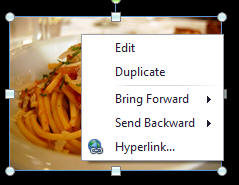
If you need to make a copy of a picture within a spreadsheet, then click on the picture and use the right mouse click menu's 'Duplicate' option. This will duplicate the picture and keep all the original source picture settings. You could use copy and paste but this just copies the picture and inserts as an embedded picture and then you only have resizing option. If you use copy and paste, rather than duplicate, on a Repeat Icon, then again makes the copy an embedded image and you will be able to edit and switch to a different icon, or change colours.
Preview at control size button
A spreadsheet's sheet isn't a set size, it's a huge sheet of cells. You will only see the part of your sheet that fits with your spreadsheet controls window. When using the built-in spreadsheet, use the 'Preview at control size' button to quickly see what will be seen in your final control at the current zoom size:

See Spreadsheet preview at same size as control for details.
A word about fonts
This control uses fonts installed on your computer. These fonts need to also be installed on the computers playing your presentations for your presentation to look correct. See Fonts in Repeat Signage for more information.